반응형
Zabbix 7.0 LTS에서 API를 사용하는 방법
Zabbix RESTful API를 통해 HTTP 요청(주로 POST)을 보내는 방식입니다. 이를 통해 호스트, 아이템, 트리거, 그래프, 사용자 등을 자동화하거나 외부 시스템과 연동할 수 있습니다.
API 접속 URL 확인
http://<ZABBIX_URL>/zabbix/api_jsonrpc.php실제 API 요청 테스트
Zabbix 서버에서 API 버전 정보를 확인
curl -s -X POST -H "Content-Type: application/json-rpc" \
-d '{"jsonrpc":"2.0","method":"apiinfo.version","params":{},"id":1}' \
http://<zabbix-server>/api_jsonrpc.php{"jsonrpc":"2.0","result":"7.0.8","id":1}인증(login)
CLI(curl)로 API 토큰 생성
- Admin 사용자로 로그인 (user.login)
curl -s -X POST -H 'Content-Type: application/json' -d '{
  "jsonrpc": "2.0",
  "method": "user.login",
  "params": {
    "user": "Admin",
    "password": "zabbix"
  },
  "id": 1,
  "auth": null
}' http://<zabbix-server>/api_jsonrpc.php
{
"jsonrpc": "2.0",
"result": "a1b2c3d4e5f6g7h8i9j0",
"id": 1
}- API 토큰 생성 (user.token.create)
curl -s -X POST -H "Content-Type: application/json-rpc" \
-d '{
  "jsonrpc": "2.0",
  "method": "user.token.create",
  "params": {
    "name": "my-api-token",
    "userid": "1",               // 보통 Admin은 ID가 1
    "expiration": 0              // 만료 없음 (초 단위, 예: 86400은 1일)
  },
  "id": 2,
  "auth": "YOUR_AUTH_TOKEN"
}' \
http://<zabbix-server>/api_jsonrpc.php
{
"jsonrpc": "2.0",
"result": {
"token": "eyJhbGciOiJIUzI1NiIsInR5cCI6IkpXVCJ9...",
"tokenid": "9"
},
"id": 2
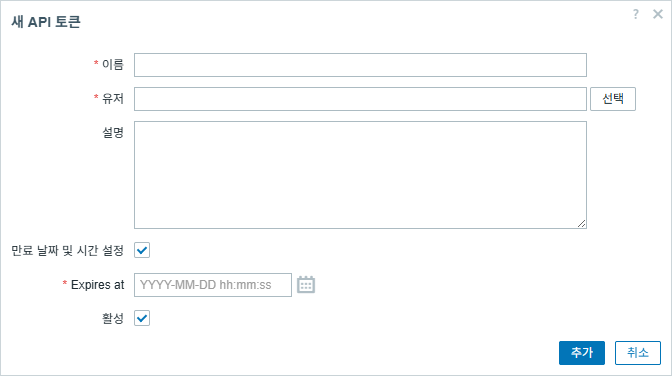
}Web UI로 API 토큰 생성
- Zabbix Web UI → "유저" → "API 토큰" → "API 토큰 생성"
728x90
API 호출 : 호스트 리스트 조회
curl -s -X POST -H 'Content-Type: application/json' -d '{
  "jsonrpc": "2.0",
  "method": "host.get",
  "params": {
    "output": ["hostid", "name"]
  },
  "auth": "a1b2c3d4e5f6g7h8i9j0",
  "id": 2
}' http://<zabbix-server>/api_jsonrpc.php
필수 도구
sudo apt install -y jq curlZabbix API를 통해 특정 호스트 그룹 및 템플릿을 지정해 호스트를 등록하는 방법
우분투 24.04에 Zabbix Agent 2 설치
Zabbix Agent 2 설치
# 1. Zabbix 저장소 추가
wget https://repo.zabbix.com/zabbix/7.0/ubuntu/pool/main/z/zabbix-release/zabbix-release_7.0-2+ubuntu24.04_all.deb
sudo dpkg -i zabbix-release_7.0-2+ubuntu24.04_all.deb
sudo apt update

# 2. Zabbix agent2 설치
sudo apt install zabbix-agent2
Zabbix Agent 2 설정 변경
sudo vim /etc/zabbix/zabbix_agent2.confServer=192.168.0.100 # Zabbix Server IP
ServerActive=192.168.0.100 # Zabbix Server IP
Hostname=agent1.example.com # 이 서버의 호스트 이름(등록할 이름과 일치해야 함)Zabbix Agent 2 서비스 시작
sudo zabbix_agent2 -T /etc/zabbix/zabbix_agent2.conf
sudo systemctl enable --now zabbix-agent2
sudo systemctl restart zabbix-agent2
Zabbix API를 통해 호스트 등록(호스트 그룹 + 템플릿 포함)
인증 토큰 받기
auth_token=$(curl -s -X POST -H "Content-Type: application/json-rpc" \
-d '{
  "jsonrpc": "2.0",
  "method": "user.login",
  "params": {
    "user": "Admin",
    "password": "zabbix"
  },
  "id": 1,
  "auth": null
}' http://<zabbix-server>/api_jsonrpc.php | jq -r '.result')
호스트 그룹 ID 조회(Linux servers)
group_id=$(curl -s -X POST -H "Content-Type: application/json-rpc" \
-d "{
  \"jsonrpc\": \"2.0\",
  \"method\": \"hostgroup.get\",
  \"params\": {
    \"filter\": {\"name\": [\"Linux servers\"]}
  },
  \"auth\": \"$auth_token\",
  \"id\": 2
}" http://<zabbix-server>/api_jsonrpc.php | jq -r '.result[0].groupid')
템플릿 ID 조회(Linux by Zabbix agent)
template_id=$(curl -s -X POST -H "Content-Type: application/json-rpc" \
-d "{
  \"jsonrpc\": \"2.0\",
  \"method\": \"template.get\",
  \"params\": {
    \"filter\": {\"name\": [\"Linux by Zabbix agent\"]}
  },
  \"auth\": \"$auth_token\",
  \"id\": 3
}" http://<zabbix-server>/api_jsonrpc.php | jq -r '.result[0].templateid')
호스트 등록
curl -s -X POST -H "Content-Type: application/json-rpc" \
-d "{
  \"jsonrpc\": \"2.0\",
  \"method\": \"host.create\",
  \"params\": {
    \"host\": \"agent1.example.com\",
    \"interfaces\": [
      {
        \"type\": 1,
        \"main\": 1,
        \"useip\": 1,
        \"ip\": \"192.168.0.110\",
        \"dns\": \"\",
        \"port\": \"10050\"
      }
    ],
    \"groups\": [{\"groupid\": \"$group_id\"}],
    \"templates\": [{\"templateid\": \"$template_id\"}]
  },
  \"auth\": \"$auth_token\",
  \"id\": 4
}" http://<zabbix-server>/api_jsonrpc.php | jq
확인
- Zabbix Web UI → "데이터 수집" > "호스트" 에서 agent1.example.com 이 등록되어 있고 상태가 ZBX 초록색이면 정상입니다.
미리 생성된 API 토큰을 사용하여 호스트를 등록하는 스크립트
스크립트 작성
vim register_host.sh#!/bin/bash
# Zabbix Server
ZBX_URL="http://<zabbix-server>/api_jsonrpc.php"
# API 토큰 (사용자가 제공)
auth_token="your_api_token_here"
# 설정할 호스트 정보
GROUP_NAME="Linux servers"
TEMPLATE_NAME="Linux by Zabbix agent"
HOST_NAME="agent1.example.com"
HOST_IP="192.168.0.110"
# 호스트 그룹 ID 조회
group_id=$(curl -s -X POST -H "Content-Type: application/json-rpc" \
-d "{
\"jsonrpc\": \"2.0\",
\"method\": \"hostgroup.get\",
\"params\": {
\"filter\": {\"name\": [\"$GROUP_NAME\"]}
},
\"auth\": \"$auth_token\",
\"id\": 2
}" $ZBX_URL | jq -r '.result[0].groupid')
# 호스트 그룹 ID가 없다면 에러 처리
if [ -z "$group_id" ]; then
echo "❌ 호스트 그룹 [$GROUP_NAME] 조회 실패 또는 그룹이 없습니다."
exit 1
fi
# 템플릿 ID 조회
template_id=$(curl -s -X POST -H "Content-Type: application/json-rpc" \
-d "{
\"jsonrpc\": \"2.0\",
\"method\": \"template.get\",
\"params\": {
\"filter\": {\"name\": [\"$TEMPLATE_NAME\"]}
},
\"auth\": \"$auth_token\",
\"id\": 3
}" $ZBX_URL | jq -r '.result[0].templateid')
# 템플릿 ID가 없다면 에러 처리
if [ -z "$template_id" ]; then
echo "❌ 템플릿 [$TEMPLATE_NAME] 조회 실패 또는 템플릿이 없습니다."
exit 1
fi
# 호스트 등록
result=$(curl -s -X POST -H "Content-Type: application/json-rpc" \
-d "{
\"jsonrpc\": \"2.0\",
\"method\": \"host.create\",
\"params\": {
\"host\": \"$HOST_NAME\",
\"interfaces\": [
{
\"type\": 1,
\"main\": 1,
\"useip\": 1,
\"ip\": \"$HOST_IP\",
\"dns\": \"\",
\"port\": \"10050\"
}
],
\"groups\": [{\"groupid\": \"$group_id\"}],
\"templates\": [{\"templateid\": \"$template_id\"}]
},
\"auth\": \"$auth_token\",
\"id\": 4
}" $ZBX_URL)
# 등록된 호스트 ID 확인
hostid=$(echo "$result" | jq -r '.result.hostids[0]')
# 호스트 등록 성공 여부 확인
if [ "$hostid" != "null" ]; then
echo "✅ 호스트 등록 완료 (hostid: $hostid)"
else
# 오류 처리
echo "❌ 호스트 등록 실패: $(echo $result | jq '.error.message')"
exit 1
fi스크립트 실행 권한 부여
chmod +x register_host.sh스크립트 실행
./register_host.sh
728x90
반응형
'리눅스' 카테고리의 다른 글
| CentOS 8에서 최신 버전의 Docker를 설치하는 방법 (0) | 2025.05.07 |
|---|---|
| 우분투 24.04에 Authentik을 설치하고 사용하는 방법 (0) | 2025.05.07 |
| 우분투 24.04에서 ntpdate와 hwclock을 사용하여 시스템 시간 및 하드웨어 클럭을 수동으로 동기화하는 방법 (0) | 2025.05.07 |
| 리눅스 eval 명령어 사용법 정리 (0) | 2025.05.05 |
| Apache 웹 서버에서 LimitExcept 및 Limit 디렉티브를 사용하여 특정 HTTP 메서드에 대한 액세스 제한을 설정하는 방법 (0) | 2025.05.05 |


