반응형
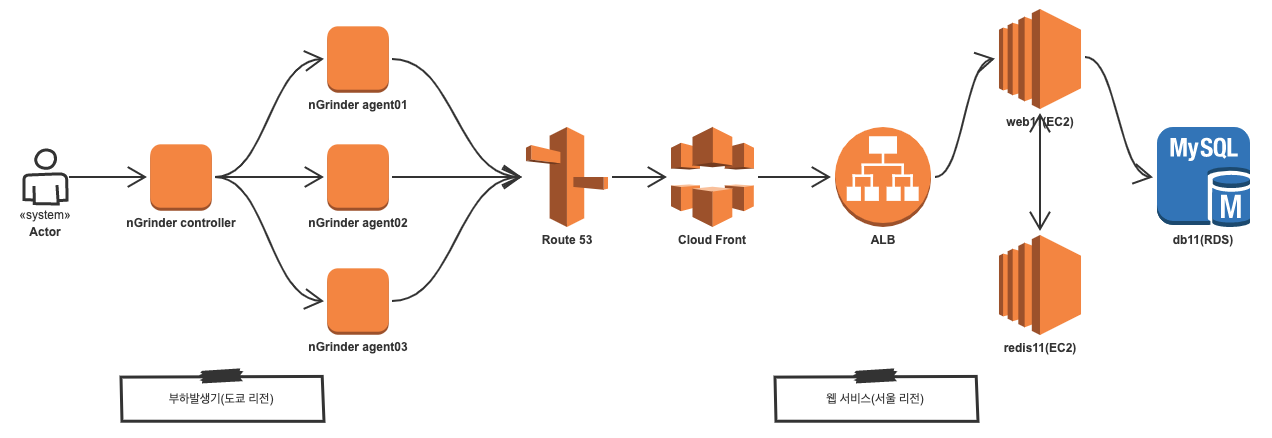
docker-compose를 사용하여 ngrinder 컨트롤러 및 에이전트를 설정하는 방법
1. Docker 및 Docker Compose 설치
2. Docker Compose 파일 생성
vim docker-compose.ymlversion: '3.8'
services:
controller:
image: ngrinder/controller:latest
restart: always
container_name: controller
hostname: controller
sysctls:
- net.core.somaxconn=65000
ports:
- 8888:80
- 16001:16001
- 12000-12009:12000-12009
volumes:
- /usr/share/zoneinfo/Asia/Seoul:/etc/localtime:ro
- ./ngrinder-controller-date:/opt/ngrinder-controller
agent1:
image: ngrinder/agent:latest
restart: always
container_name: agent1
hostname: agent1
sysctls:
- net.core.somaxconn=65000
ulimits:
memlock:
soft: -1
hard: -1
nproc:
soft: 1024000
hard: 1024000
nofile:
soft: 1024000
hard: 1024000
links:
- controller:controller
volumes:
- /usr/share/zoneinfo/Asia/Seoul:/etc/localtime:ro
#- ./ngrinder-agent:/opt/ngrinder-agent
#- ./ngrinder-agent/agent.conf:/opt/ngrinder-agent/.ngrinder-agent/agent.conf3. ngrinder 웹 콘솔 확인
http://localhost:8888- 초기 계정 정보 : admin / admin

ngrinder controller - 에이전트 관리

4. 스크립트 생성
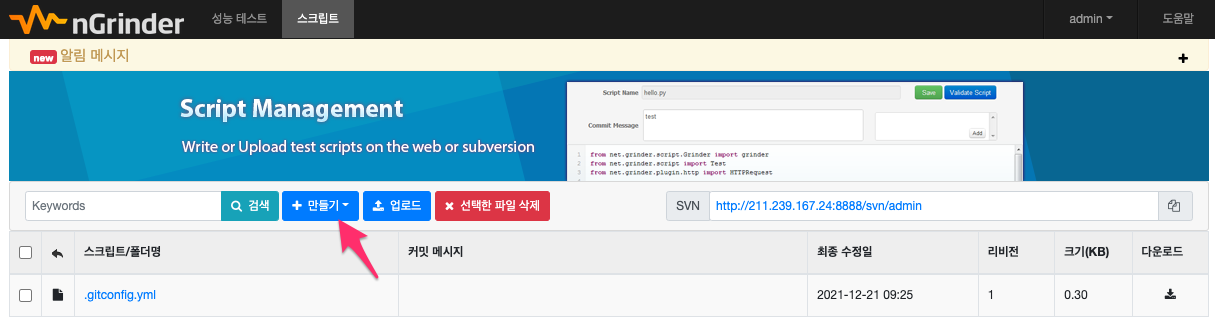
- 스크립트명 : sangchul.kr
- 테스트할 URL : https://sangchul.kr

import static net.grinder.script.Grinder.grinder
import static org.junit.Assert.*
import static org.hamcrest.Matchers.*
import net.grinder.script.GTest
import net.grinder.script.Grinder
import net.grinder.scriptengine.groovy.junit.GrinderRunner
import net.grinder.scriptengine.groovy.junit.annotation.BeforeProcess
import net.grinder.scriptengine.groovy.junit.annotation.BeforeThread
// import static net.grinder.util.GrinderUtils.* // You can use this if you're using nGrinder after 3.2.3
import org.junit.Before
import org.junit.BeforeClass
import org.junit.Test
import org.junit.runner.RunWith

import org.ngrinder.http.HTTPRequest
import org.ngrinder.http.HTTPRequestControl
import org.ngrinder.http.HTTPResponse
import org.ngrinder.http.cookie.Cookie
import org.ngrinder.http.cookie.CookieManager

/**
* A simple example using the HTTP plugin that shows the retrieval of a single page via HTTP.
*
* This script is automatically generated by ngrinder.
*
* @author admin
*/
@RunWith(GrinderRunner)
class TestRunner {

	public static GTest test
	public static HTTPRequest request
	public static Map<String, String> headers = [:]
	public static Map<String, Object> params = [:]
	public static List<Cookie> cookies = []

	@BeforeProcess
	public static void beforeProcess() {
		HTTPRequestControl.setConnectionTimeout(300000)
		test = new GTest(1, "www.sangchul.kr")
		request = new HTTPRequest()
		grinder.logger.info("before process.")
	}

	@BeforeThread
	public void beforeThread() {
		test.record(this, "test")
		grinder.statistics.delayReports = true
		grinder.logger.info("before thread.")
	}

	@Before
	public void before() {
		request.setHeaders(headers)
		CookieManager.addCookies(cookies)
		grinder.logger.info("before. init headers and cookies")
	}

	@Test
	public void test() {
		HTTPResponse response = request.GET("http://www.sangchul.kr", params)

		if (response.statusCode == 301 || response.statusCode == 302) {
			grinder.logger.warn("Warning. The response may not be correct. The response code was {}.", response.statusCode)
		} else {
			assertThat(response.statusCode, is(200))
		}
	}
}
성능 테스트

- 테스트명 : sangchul.kr
- 에이젠트 : 1
- 스크립트 : svn sangchul.kr.groovy
- 테스트 대상 서버 : www.sangchul.kr


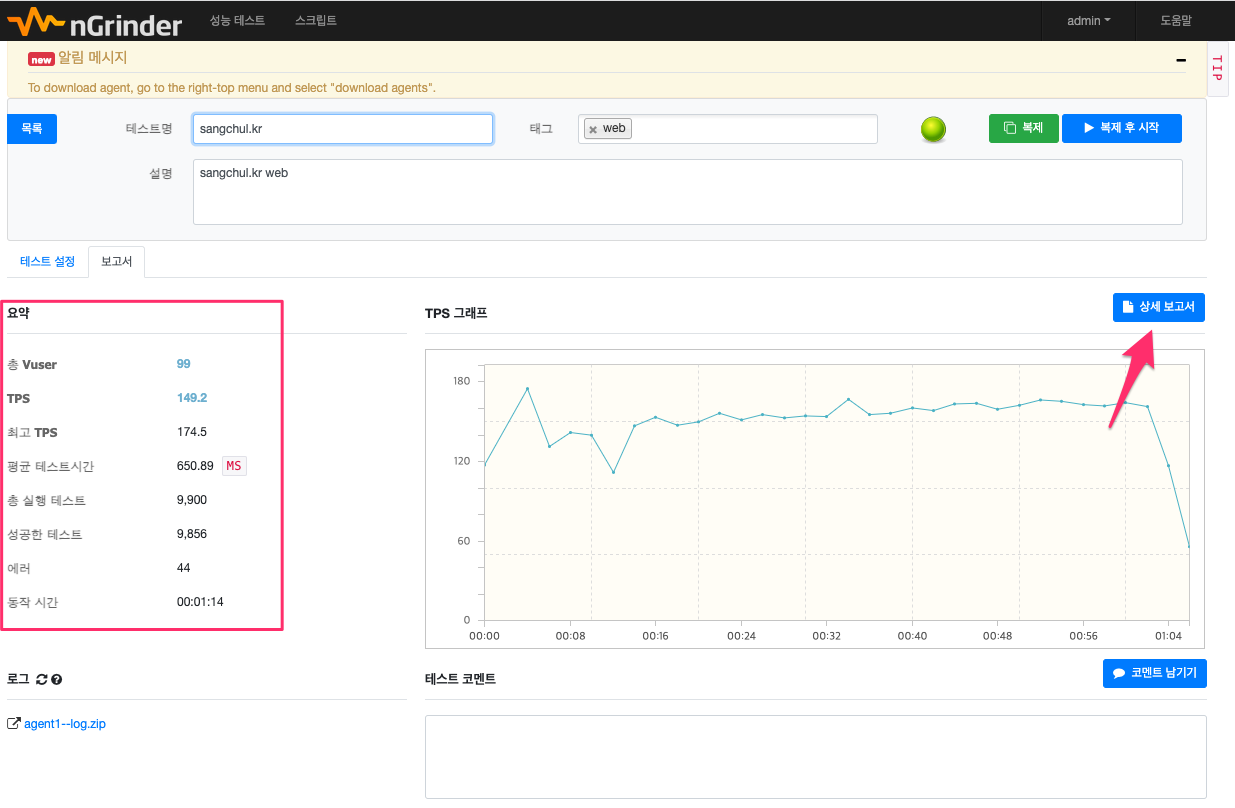
5. 성능 테스트 보고서

참고URL
- https://github.com/naver/ngrinder/wiki/Architecture
- https://naver.github.io/ngrinder/
- https://github.com/anti1346/docker-ngrinder
728x90
반응형
'리눅스' 카테고리의 다른 글
| CentOS 7에서 레디스를 설치하는 방법 (0) | 2020.08.27 |
|---|---|
| 우분투에 Go를 설치하는 방법 (0) | 2020.08.26 |
| CentOS 7에서 Created slice 및 Starting Session과 같은 로그를 제거하는 방법은 (0) | 2020.08.19 |
| JMeter를 설치하는 방법 (0) | 2020.08.19 |
| SSH 접속 시간을 체크하는 방법 (0) | 2020.08.04 |


